
How to Repair a Neoprene Wetsuit Tear: The Athlete’s Guide to Gear Longevity
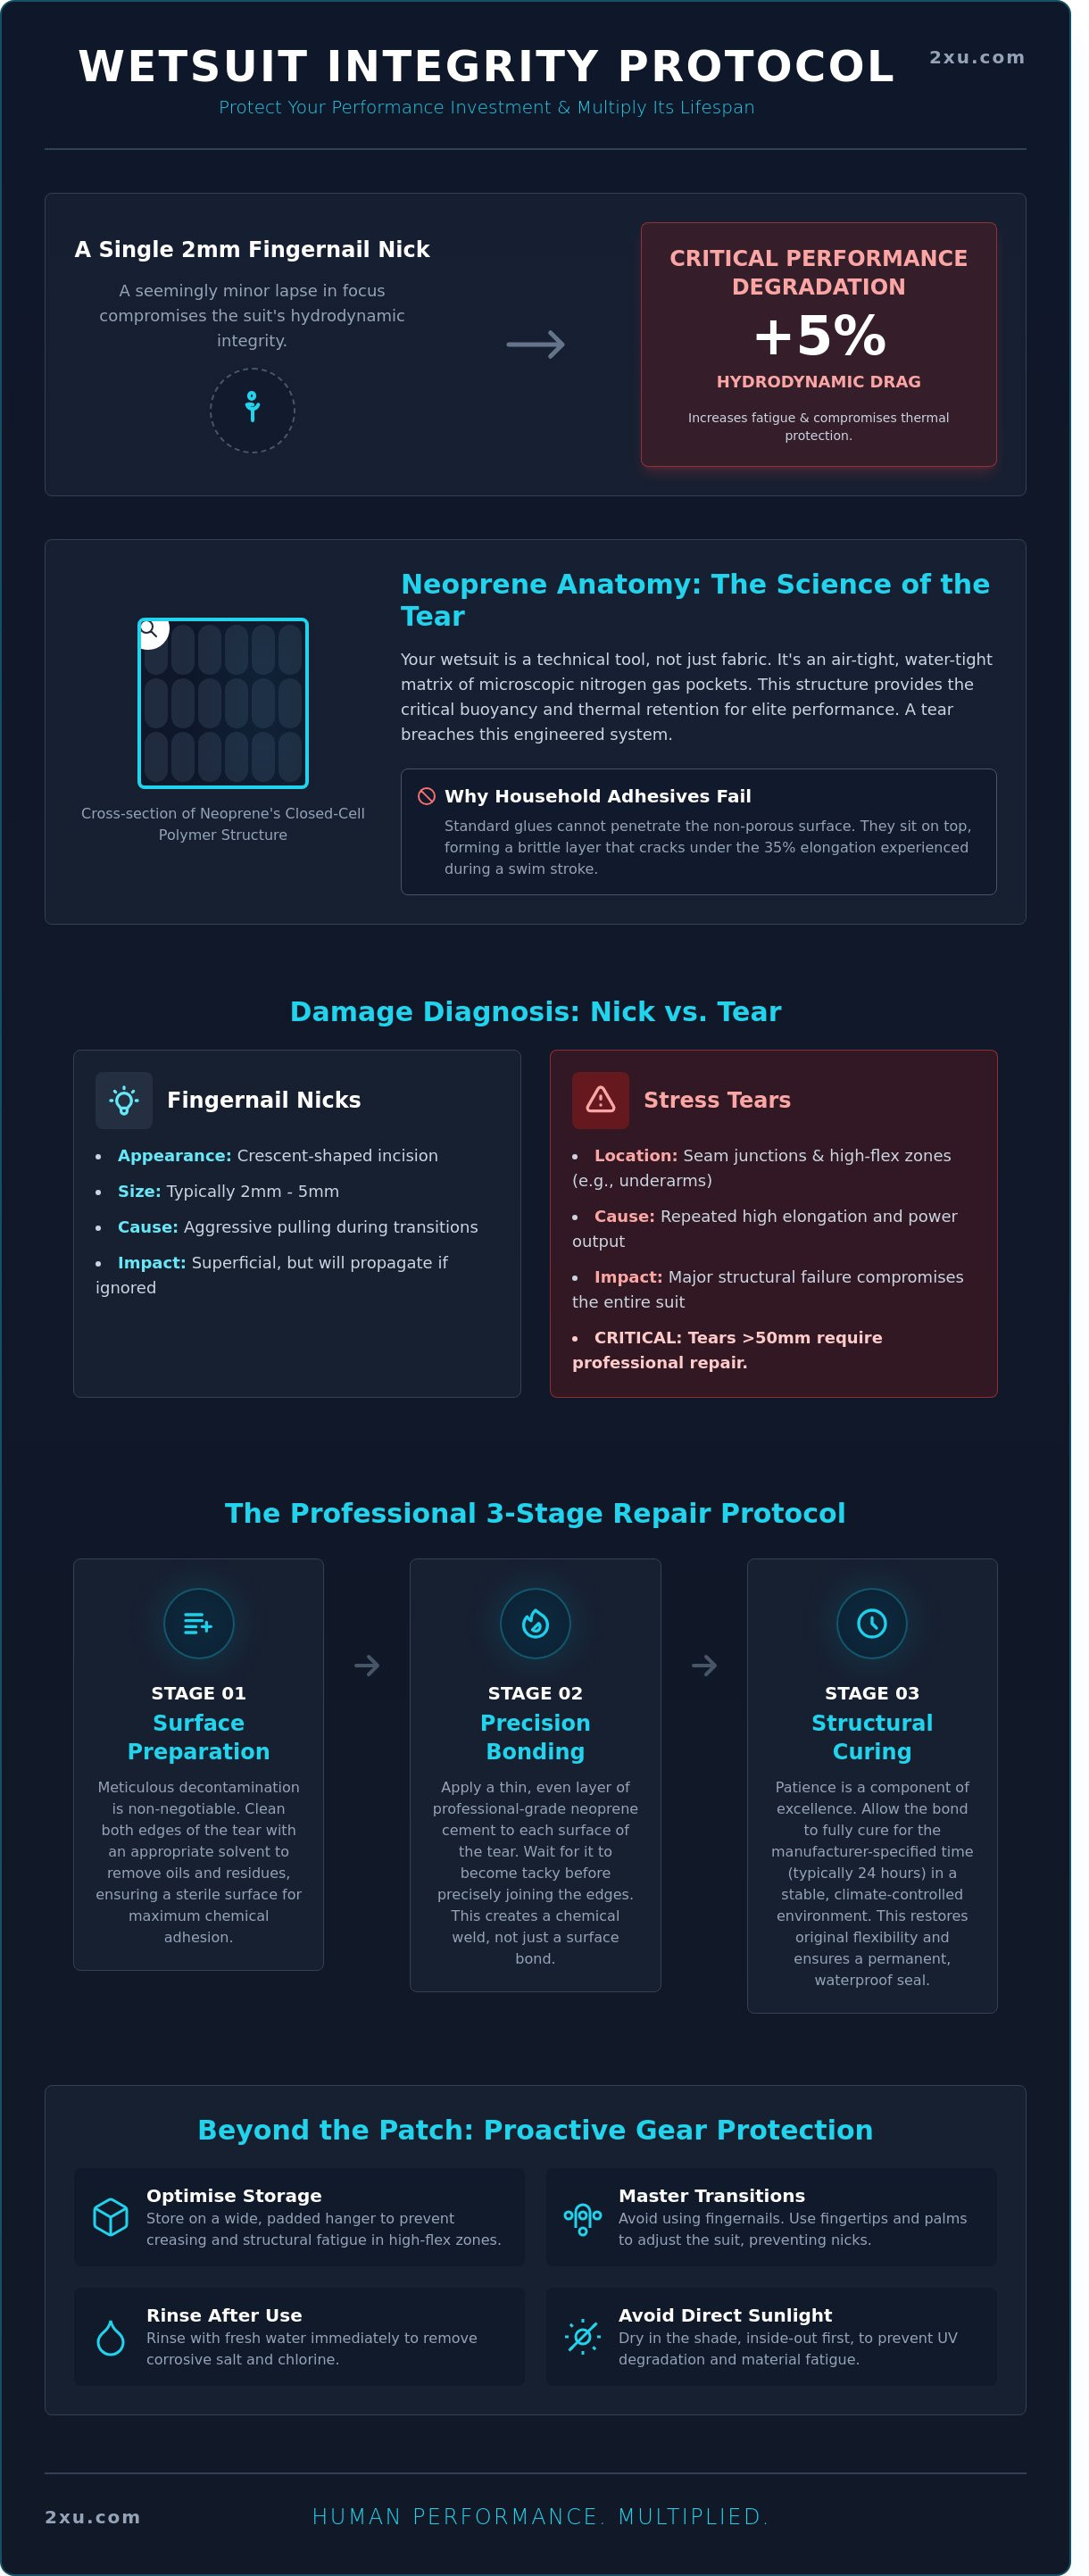
A single 2mm fingernail nick can compromise the hydrodynamic integrity of your suit, potentially increasing drag by 5 percent during a high-intensity session. You understand that in elite performance, every millimetre matters. It's frustrating to see a premium piece of engineered equipment damaged by a momentary lapse in focus, and the anxiety of that tear expanding during a 3.8km open water swim is a distraction you don't need. You've earned your place on the starting line through discipline and respect for the grind; your gear must reflect that same standard of excellence.
We agree that gear failure is not an option when you're pushing for a personal best. This guide provides the definitive protocol on how to repair a neoprene wetsuit tear using methods designed to ensure a permanent, waterproof bond that maintains original flexibility. You'll master the technical skills required to protect your suit's performance specifications and multiply its functional lifespan. We'll move through the three-stage process of surface preparation, precision bonding, and structural curing to return your gear to race-ready condition.
Key Takeaways
- Respect the grind by treating your gear as a critical extension of your performance, ensuring every session is backed by equipment that will not fail.
- Analyse the anatomy of closed-cell polymers to differentiate between minor surface nicks and critical punctures that compromise your thermal protection.
- Master how to repair a neoprene wetsuit tear using an engineered protocol that prioritises professional-grade cement over substandard household adhesives.
- Execute a meticulous decontamination and bonding sequence to restore the hydrodynamic integrity of your suit to elite standards.
- Optimise your gear’s lifespan with professional storage and transition techniques designed to prevent neoprene cracking and structural fatigue.
The Reality of the Grind: Why Wetsuit Maintenance is Non-Negotiable
Your wetsuit is more than a layer of rubber; it is a critical extension of your physiological capabilities. In the high-stakes environment of open water swimming, this garment acts as performance armour, engineered to provide the buoyancy and thermal protection required to sustain elite output. When you ignore a small nick or a fingernail cut, you are not just being casual with your gear; you are actively choosing to degrade your performance potential. At 2XU, our philosophy is simple: Human Performance. Multiplied. This multiplication only occurs when every variable, including your equipment, is optimized for the grind.
The financial and environmental costs of gear neglect are substantial. Premium wetsuits are significant investments in your athletic career, and replacing a suit prematurely due to avoidable damage is a failure of discipline. Beyond the cost, the environmental impact of discarded materials is a weight no responsible athlete should carry. Learning how to repair a neoprene wetsuit tear is a fundamental skill that separates the meticulous professional from the amateur. This focus on precision is common in any field where assets must be maintained; for instance, you can learn more about 1ESX Roof & Wall Reports to see how digital measurements are used to protect structural investments. Understanding The Science of Neoprene reveals that this material relies on a closed-cell structure to maintain its properties. Once that structure is breached, the clock begins ticking on the suit's total lifespan.
The Performance Cost of Neglect
Water ingress through even a minor tear creates immediate drag. This extra weight forces your body to work harder to maintain the same velocity, effectively increasing your stroke count and heart rate. Furthermore, these tears create "cold spots" where the internal thermal layer is flushed out by fresh, cold water. This disruption forces your system to divert blood flow from your working muscles to your core to maintain temperature, leading to premature muscle oscillation and fatigue. A 1mm nick today is a structural liability; under the explosive stress of a race-day transition, that small weakness will become a 10cm rip that ends your day before the bike leg begins.
Earning Your Place: The Discipline of Care
Elite performance is built on the foundation of meticulous preparation. You must frame gear maintenance as a non-negotiable component of your training programme, just as vital as your interval sessions or recovery protocols. There is a distinct psychological edge gained when you stand on the shoreline knowing your equipment is in peak condition. It eliminates doubt and sharpens your focus on the objective. Transitioning from a casual user to a disciplined athlete means taking full ownership of your kit. By mastering how to repair a neoprene wetsuit tear, you demonstrate the respect for the grind that is required to reach the next level of your development.
Neoprene Anatomy: Understanding the Science of the Tear
Neoprene is a sophisticated closed-cell polymer engineered for elite thermal insulation and hydrodynamics. It consists of thousands of microscopic nitrogen gas pockets trapped within a polychloroprene matrix. This cellular structure creates the buoyancy and heat retention required for high-performance open water swimming. When you learn how to repair a neoprene wetsuit tear, you're maintaining a technical tool, not just a piece of fabric. Unlike porous textiles, neoprene is air-tight and water-tight. This means common household adhesives cannot penetrate the surface to form a mechanical bond. They simply sit on the surface and brittle under pressure.
The role of tension is critical in gear failure. During a standard swim stroke, high-flex zones like the axilla (underarm) experience up to 35% elongation. This constant stretching forces small nicks to propagate into major structural failures. Understanding the physics of your suit is the first step toward elite gear longevity. You must respect the equipment that facilitates your grind.
Fingernail Nicks vs. Stress Tears
Precision is required during diagnosis. Fingernail nicks are the most common injury, typically appearing as 2mm to 5mm crescent-shaped incisions caused by aggressive pulling during T1 transitions. These are superficial but compromise the suit's integrity if ignored. Stress tears occur at seam junctions or high-flex zones. These areas handle the bulk of your power output. If a tear exceeds 50mm in length or occurs directly through a heat-taped seam, the structural integrity is compromised. At this stage, your gear may require professional vulcanisation or replacement to ensure your performance remains uncompromised. Recognise the limits of a home repair to avoid mid-race failure.
The Molecular Bond
Standard glues fail because they create a brittle layer on top of a flexible surface. Effective repair requires a chemical transition. Neoprene cement operates through a process of solvent evaporation. The solvent briefly liquefies the polychloroprene edges, allowing the polymer chains to intermingle as the carrier fluid flashes off. Neoprene cement is a contact adhesive that vulcanises the edges together. This creates a chemical weld that is as strong as the original material. You aren't just sticking two sides together; you're reforming the molecular structure of the suit. This level of meticulous maintenance is vital when learning how to repair a neoprene wetsuit tear properly. It's about preparation and discipline. Every piece of equipment must be ready for the load you intend to place on it.
The Essential Wetsuit Repair Toolkit: Engineering a Permanent Fix
Mediocrity has no place in your training. When your gear fails, you don't discard it; you restore its integrity. Learning how to repair a neoprene wetsuit tear requires more than just a tube of glue; it demands an engineering mindset and precision tools. A professional-grade repair ensures your suit maintains its hydrodynamic profile and thermal efficiency during high-intensity sessions. You're not just patching a hole. You're re-engineering the garment to withstand the rigours of the grind.
Your primary agent is specialised neoprene cement. Black cement is the standard for most 2XU performance suits, providing a seamless aesthetic finish that matches the original material. Clear options are reserved for thinner, 1.5mm panels where visual subtlety is required. You must avoid household glues and petroleum-based products at all costs. These substances are corrosive to the nitrogen-blown rubber cells. They create brittle bonds that crack under the 30% to 50% elongation experienced during a swim stroke. Surface preparation requires 99% isopropyl alcohol to strip away body oils and salt deposits that inhibit molecular bonding.
Precision requires the right instruments. Use these tools for a controlled application:
- Toothpicks: Essential for injecting cement into micro-tears under 5mm without over-application.
- Small Brushes: Best for distributing even, thin coats on larger gouges or fingernail cuts.
- Weighted Objects: A flat 2kg dumbbell provides the necessary constant pressure for a high-density bond during the initial set.
Professional Grade Materials
Elite performance demands elite materials. Aquaseal Neo is a fast-curing contact cement that creates a permanent, flexible seal in approximately 20 minutes. For interior reinforcement, use heat-activated tape to support high-stress zones like the underarms or crotch. We use engineered fabrics and polymer-based compounds because they mirror the mechanical properties of the original suit. Standard adhesives fail because they cannot match the modulus of elasticity required for elite movement. If the material doesn't stretch with you, it isn't fit for purpose.
Setting Up Your Workshop
Control your environment to control your results. You need a dry, well-ventilated space to handle the chemical outgassing of the adhesives safely. Organising your workspace on a flat, stable surface is non-negotiable. This prevents the neoprene from stretching or distorting while the bond cures. A distorted bond creates a drag point in the water, costing you valuable seconds. Mastery of how to repair a neoprene wetsuit tear starts with a clean, disciplined workshop. Prepare your tools before you open the cement to ensure a fast, efficient application that respects your time and your gear.
The Step-by-Step Protocol: Repairing Your Wetsuit Like a Pro
Precision in maintenance is the difference between gear that fails mid-race and gear that facilitates a podium finish. You don't just "fix" a suit; you restore its structural integrity. This protocol demands discipline and a meticulous approach to chemistry and alignment. When you understand how to repair a neoprene wetsuit tear correctly, you ensure your equipment remains an extension of your physiology rather than a liability in the water.
Preparation and Priming
Success begins with decontamination. Every trace of salt, sand, and skin oil must be eliminated to allow the adhesive to fuse at a molecular level. Rinse the area with fresh water and follow with a 70% isopropyl alcohol wipe to strip away residual contaminants. Your suit must be 100% dry; moisture is the enemy of a permanent bond. Use 25mm masking tape to border the tear, leaving only 2mm of neoprene exposed. This protects the surrounding high-performance fabric from excess cement and ensures a clean, professional finish. Open the tear wide to expose the internal cellular structure of the neoprene, providing the maximum surface area for the primary coat.
Application and Bonding
Execution requires patience. Apply two thin, uniform layers of neoprene cement to both edges of the tear. Avoid thick, messy applications that create bulk and increase drag. You must wait 5 to 10 minutes for the solvent to flash off. This is the "Tack Test" phase. Touch the glue with a clean fingernail; if it feels tacky but doesn't transfer to your skin, the chemistry is ready. Align the edges with surgical precision. Press them together firmly, starting from one end and working to the other. Aim for a flush finish that restores the smooth surface of the suit, as even a 1mm ridge can disrupt laminar flow and decrease your hydrodynamic efficiency.
Reinforcing Stress Zones
High-movement areas like the underarm or crotch require more than just a surface bond. For tears in these zones, apply an interior patch to distribute the load during high-intensity strokes. Place a 0.5kg weight on the repair site for the first 60 minutes of the curing process to ensure constant, even pressure. This step is vital for maintaining the suit’s proprietary stretch profiles. To understand the materials you are working with, review the Neoprene Wetsuit Science to see how these engineered layers multiply your performance. Allow a full 24 hours for the bond to cure before exposing the suit to tension or water. Respect the grind of maintenance so your gear can respect the intensity of your race.
Maximise your output with gear engineered for elite results. Shop high-performance wetsuits at 2XU
Beyond the Patch: Protecting Your Performance Investment
Mastering how to repair a neoprene wetsuit tear is an essential skill, but it remains a reactive measure. Elite performance demands proactive gear management. Your wetsuit is an engineered tool designed for speed and thermal regulation; it isn't just another piece of kit. Treat it with the same discipline you apply to your interval training. Protecting the integrity of the neoprene ensures that your power output isn't wasted fighting against compromised equipment.
Advanced Transition Techniques
Fingernail nicks account for 80% of preventable neoprene damage during the transition phase. Adopt the "white glove" method by using thin cotton gloves or even plastic bags over your hands and feet during entry. This allows your limbs to slide through the technical inner linings without snagging the delicate outer skin. You must avoid petroleum-based lubricants at all costs. These substances dissolve the chemical bonds of the neoprene, leading to irreversible delamination. Use only water-based lubricants to reduce friction at the wrists and ankles. When pulling the suit up, use the pads of your fingers and work in small, 5cm increments to distribute tension evenly. For more on optimising your race-day setup, consult our Triathlon Suit Guide to ensure your gear is ready for maximum velocity.
Long-Term Gear Preservation
Maintenance starts the second you exit the water. Salt crystals and chlorine act as aggressive abrasive agents that accelerate material fatigue and weaken glue lines. Rinse your suit in fresh water after every session to remove these minerals. Drying requires precision and the right equipment. Use a wide-shouldered hanger, minimum 5cm in width, to prevent seam distortion under the weight of the wet material. Standard wire hangers will slice through the shoulder profile over time.
Never fold your suit for long-term storage. Folding compresses the nitrogen-injected cells, leading to a permanent loss of buoyancy and a 15% reduction in thermal efficiency over a single six-month season. Store the suit flat or draped over a thick, padded bar in a cool, dark environment. UV exposure for as little as 4 hours can begin the process of polymer degradation, making the material brittle. Conduct a full tactile inspection every 14 days. Running your fingers along the seams allows you to identify micro-nicks before they evolve into structural failures. Discipline in storage is the difference between a suit that lasts one season and one that lasts four.
Engineer Your Longevity: From Repair to Race Day
Maintaining your gear is a direct extension of your training. It requires the same unyielding discipline you bring to the starting line. You have now mastered how to repair a neoprene wetsuit tear using a precise engineering protocol; moving from assembling a professional toolkit to executing a permanent, performance-ready bond. This process isn't just about a simple patch. It's about respecting the grind and ensuring your equipment never dictates your physical limits. When your current gear reaches its physiological end, you must upgrade to technology that matches your ambition.
2XU wetsuits are engineered with premium Yamamoto neoprene for maximum buoyancy and reduced drag. Our designs are tested in elite research labs to ensure graduated pressure profiles that multiply your power output. This is the same gear trusted by world-class triathletes to multiply their performance on race day. Don't settle for mediocrity when you can optimise every second of your swim. It's time to outwork the competition and earn your place at the front of the pack. Your breakthrough is waiting.
Shop 2XU High-Performance Triathlon Wetsuits
Frequently Asked Questions
How long does wetsuit glue take to dry before I can swim?
Standard neoprene adhesive requires a full 24 hours to cure before it reaches 100% bond strength. While some products appear dry to the touch within 20 minutes, submerging the suit prematurely can result in a 40% reduction in seam integrity. Patience is a component of discipline; wait the full window to ensure your gear survives the rigours of your next session.
Can I use superglue to fix a small nick in my wetsuit?
Never use superglue on your wetsuit because it dries into a hard, brittle plastic that will crack under the stress of your swim stroke. High-performance gear requires flexible adhesives that move with your body. Use a dedicated neoprene cement to maintain the engineered elasticity of the suit. This ensures your range of motion remains uncompromised when you're pushing for a personal best.
What is the best way to fix a tear that goes all the way through?
To execute a professional-grade repair on a total puncture, apply adhesive to both edges and use a blind stitch for structural reinforcement. This technique involves threading the needle only halfway through the material to keep the seal watertight. Learning how to repair a neoprene wetsuit tear properly ensures your equipment performs at its peak. Use heavy-duty nylon thread to withstand the grind of daily training.
Is it worth repairing an old wetsuit or should I buy a new one?
If your suit has lost more than 25% of its original flexibility or the material shows visible signs of "sun-rot," it is time to upgrade. While small repairs extend the life of your gear, degraded material compromises buoyancy and thermal regulation. Elite performance requires equipment that functions without compromise. Assess your suit every 12 months to ensure it still meets the 2XU standard of excellence.
How do I prevent my fingernails from tearing the neoprene?
Wear cotton gloves during the fitting process to eliminate 95% of fingernail-related punctures. Most damage occurs when athletes use their fingertips rather than the pads of their fingers to pull the suit into position. Discipline in the transition area is as vital as discipline on the race course. Treat your gear with the same respect you give your training programme to ensure longevity.
Can I fix a ripped seam on my triathlon wetsuit?
You can repair a separated seam by cleaning the area with isopropyl alcohol and applying two thin layers of specialised adhesive. Seams are high-stress points that handle 100% of the tension during your reach and pull phases. If the internal heat-bonded tape is peeling, you may need an iron-on reinforcement patch to restore the factory-spec seal. This keeps you streamlined and focused on your splits.
What happens if I don’t fix a small fingernail nick?
A minor 2mm nick will quickly expand into a major structural failure under the repeated stress of high-intensity swimming. Water entering these small gaps increases drag and reduces thermal efficiency by up to 15%. Neglecting small maintenance tasks is a failure of discipline. Mastering how to repair a neoprene wetsuit tear while it is small preserves the integrity of the entire garment and your performance.
Does repairing a wetsuit void the warranty?
Most manufacturers allow for minor self-repairs using approved adhesives without voiding the standard 12-month warranty. However, major structural modifications or third-party alterations will typically terminate your coverage. Check your specific warranty documentation for the 100% accurate terms. Maintaining your own gear is part of the professional athlete's mindset; just ensure you use the correct tools for the job.